Learn
General Virtual Assistance
for FREE

Step-by-step without any steps skipped + actionable Tasks to practice


How to Start Freelancing as a General Virtual Assistant (Step-by-Step Guide)

Freelancing is one of the fastest-growing career options today, and becoming a General Virtual Assistant (GVA) is one of the easiest ways to get started—especially if you want to work from home.

Whether you’re a student, stay-at-home parent, or simply tired of commuting to an office, freelancing gives you the freedom to earn online using skills you already have.

In this guide, you’ll learn:

  • What freelancing is and how it works

  • What a General Virtual Assistant does

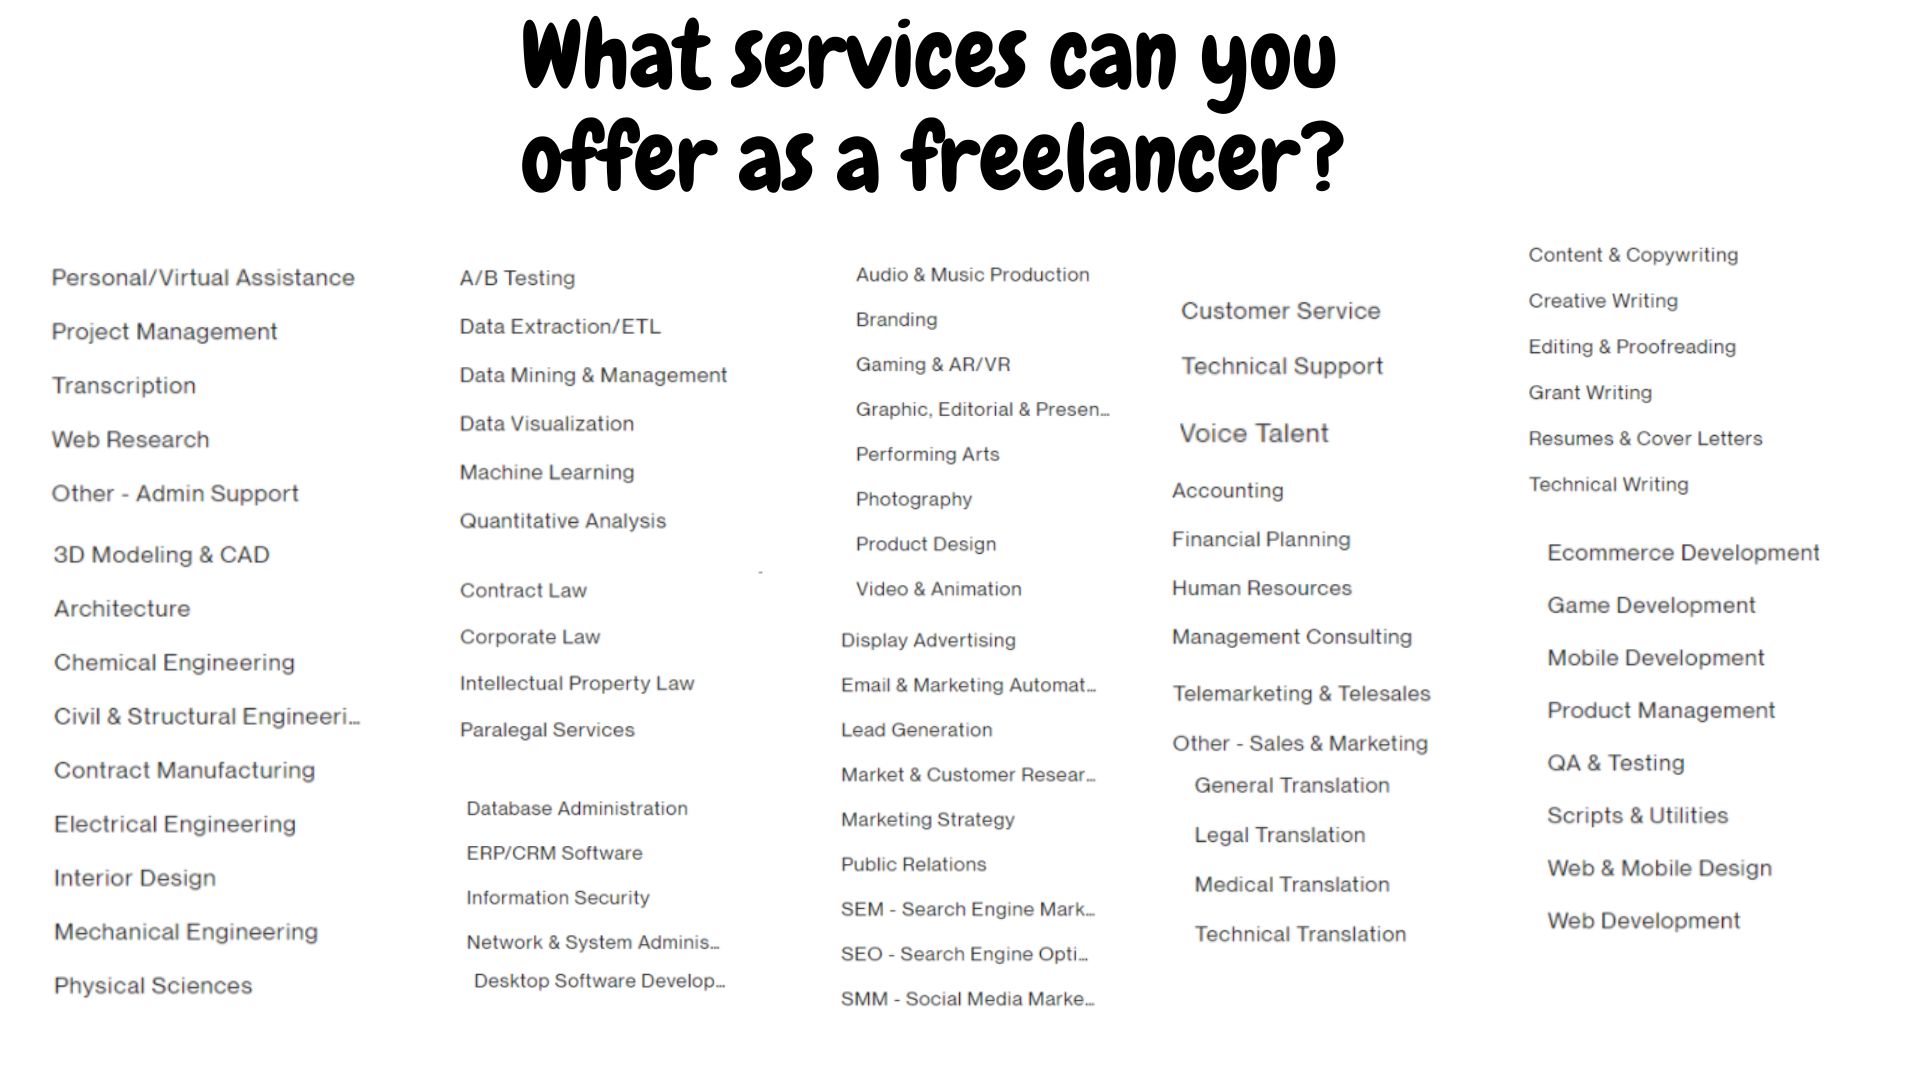
  • Services you can offer as a beginner GVA

  • The best freelancing platforms to find your first client

  • A simple action step (homework) to get started today

What is Freelancing?

Freelancing means you offer your skills or services to clients on a flexible, project-based, or long-term contract basis. Instead of being tied to one employer, you can work for multiple clients—often from the comfort of your home.

Clients are looking for reliable people who can save them time, organize tasks, and keep their business running smoothly. That’s where a Virtual Assistant comes in.

What is a General Virtual Assistant (GVA)?

A General Virtual Assistant is like a digital right hand for business owners, entrepreneurs, and professionals.
You don’t need to be a specialist to start—you just need basic computer literacy, communication skills, and the ability to learn new tools.

Here are the common tasks GVAs handle:

  • 📧 Email Management – organizing inboxes, replying to clients

  • 📅 Scheduling & Calendar Management – booking meetings, sending reminders

  • 📊 Data Entry & Research – gathering information, updating spreadsheets

  • 📂 File Organization – managing Google Drive, Dropbox, or OneDrive

  • 📱 Basic Social Media Support – uploading posts, creating captions, monitoring comments

If you can type, organize files, and communicate clearly, you already have the foundation to be a successful GVA.

Top Freelancing Platforms for Beginners

When you’re just starting out, finding legit clients is the biggest challenge. Here are the most trusted freelancing platforms where GVAs can find work:

  1. Upwork – One of the largest global freelancing platforms with clients looking for virtual assistants daily.

  2. OnlineJobs.ph – Perfect for Filipino freelancers. Clients specifically post jobs for virtual assistants here.

  3. Fiverr – A platform where you can offer “gigs” (small services like data entry, research, or social media posting).

  4. LinkedIn – Great for building a professional network and attracting clients directly.

  5. Facebook Groups – Many small businesses post VA job opportunities in freelance or remote work communities.


Why Businesses Hire General Virtual Assistants

Businesses—big or small—often can’t handle everything on their own. A GVA helps them by:

  • Saving time on repetitive tasks

  • Keeping schedules organized

  • Managing communication with clients and suppliers

  • Making sure operations run smoothly even when they’re busy

This is why virtual assistants are always in demand.


Action Step:

Your Homework for Today

👉 Write down your top 3 skills that you already have which could fit into a GVA role.

For example:

  • Fast typing → Data entry

  • Good English → Email management

  • Organized personality → Scheduling and file management

This exercise will help you match your current strengths to real client needs—so you can confidently say, “Yes, I can do that!” when you start applying for freelance jobs.


Starting as a General Virtual Assistant is one of the easiest ways to break into freelancing. You don’t need years of experience—just the right systems, tools, and willingness to learn.

In this 14-Day GVA Training Series, this is only Day 1.


Up next: we’ll set up your digital workspace so you can look and work like a real Virtual Assistant from day one.

Week 1: Foundation + Tools Setup

How to Set Up Your Digital Workspace as a Virtual Assistant: A Complete Guide

As a Virtual Assistant (VA), your digital workspace is your office, toolkit, and productivity engine. A well-organized workspace helps you handle clients efficiently, stay professional, and save hours of wasted time.

In this guide, we’ll cover:

  1. Creating a professional email address

  2. Setting up Google Workspace basics

  3. Implementing email workflow management (aka inbox management)

  4. Organizing your files for maximum efficiency

By the end, you’ll have a ready-to-use digital workspace that impresses clients and keeps you productive.


1. Create a Professional Email Address

Your email address is the first impression clients get. Using a casual or outdated email can make you look unprofessional.

Step-by-Step:

  1. Choose an email provider (Gmail is recommended for VAs).

  2. Use your full name or a combination of name + service:

  3. Set up a professional signature with your name, role, and contact info.

Pro Tip: If you want to appear even more professional, use your own domain name:

2. Set Up Google Workspace Basics

Google Workspace gives you everything a VA needs to run efficiently. These tools include Gmail, Drive, Calendar, Docs, and Sheets.

Step 1: Organize Your Drive

  • Create folders for clients: Client Name → Project → Files

  • Use clear naming conventions: Invoice_March_2025.pdf

Step 2: Master Gmail

  • Learn to send, reply, and forward professionally

  • Use labels to categorize emails (e.g., Clients, Invoices, Social Media Tasks)

Step 3: Use Google Calendar

  • Schedule meetings and tasks

  • Set reminders and recurring events for client deadlines

Step 4: Learn Google Docs & Sheets

  • Docs for reports, summaries, and proposals

  • Sheets for tracking tasks, leads, or project progress

Pro Tip: Spend time creating templates for reports, invoices, or client updates. It saves time and keeps your workspace organized.


3. Implement Email Workflow Management

Email workflow management (a professional term for inbox management) ensures you never miss a client email and stay on top of communication.

Step 1: Create Labels

  • Example: Client A, Invoices, Urgent

  • Optional: Use color coding for quick reference

Step 2: Set Filters

  • Automatically label incoming emails from clients

  • Forward emails to team members if needed

  • Example: All emails from client@company.com → labeled “Client A”

Step 3: Use Canned Responses

  • Prepare templates for common replies

  • Saves time while maintaining professionalism

Step 4: Daily Email Routine

  • Check emails 2–3 times per day

  • Process inbox by priority: urgent, tasks, updates

Pro Tip: Combining labels + filters + canned responses is the key to efficient email workflow management for VAs.


4. Organize Files & Digital Tools

Your digital workspace is more than email—it’s where all client work lives.

  • Use Google Drive or Dropbox for file storage

  • Name files clearly and consistently

  • Keep shared client folders separate from personal files

  • Regularly backup important documents

Optional Tools:

  • Trello, Asana, or ClickUp for task management

  • Slack or Microsoft Teams for team communication


Tips for a Professional Digital Workspace

  • Keep everything client-focused

  • Regularly clean your inbox and folders

  • Use shortcuts, templates, and filters to save time

  • Make your workspace easy to navigate—you want clients to feel confident in your systems


Setting up your digital workspace as a VA isn’t just about looking professional—it’s about being efficient, organized, and reliable. A solid setup with a professional email, Google Workspace mastery, and email workflow management will help you stand out to clients and handle multiple projects without stress.

Master Gmail: How to Send, Reply, and Forward Emails Like a Professional Virtual Assistant


Stop Sending Emails That Get Ignored

Every virtual assistant knows this: a sloppy email can cost you credibility. Even if your skills are top-notch, your emails may determine whether a client hires you—or ignores you. This guide teaches step-by-step Gmail mastery: from sending professional emails to replying and forwarding efficiently, all while keeping your inbox organized.

Why Gmail Mastery Matters for Virtual Assistants

As a virtual assistant, you’re the first line of communication between your clients and their projects. Mastering Gmail means:

  • Sending professional messages that get replies

  • Replying promptly without overthinking

  • Forwarding with context to avoid confusion

  • Staying organized and productive

If you can master these skills, you’re not just a VA—you’re a reliable professional clients trust.


Step 1: Set Up a Professional Gmail Account

Your email is your virtual handshake. Start with:

  • Professional email address: Use your full name (e.g., mary.gomez@gmail.com)

  • Profile setup: Add a professional photo and signature with:

    • Full name

    • Role (General Virtual Assistant)

    • Contact info + portfolio link

💡 Keep your signature clean and readable—it’s your digital business card.


Step 2: Send Emails That Get Read

Sending emails is strategic. Follow this structure:

  • Subject line mastery: Short, clear, and action-oriented

  • Body structure: Greeting → Purpose → Bullet points → Next step

  • Professional tone: Polite, confident, error-free

Step 3: Reply Professionally Without Overthinking

Replying is an art. Use these rules:

  • Use “Reply All” only when necessary

  • Quote or reference the original email for context

  • End with a clear next step or question

  • Keyboard shortcuts: R = reply, A = reply all, F = forward

Step 4: Forward Emails Strategically

Forwarding is more than “send to someone else.” Always:

  • Provide context in your note

  • Edit the subject line if needed

  • Summarize key points at the top

Example Note:
“Hi [Name], sharing this for your reference. Key points are summarized above.”


Step 5: Advanced Gmail Productivity Hacks

Boost efficiency and professionalism with these tools:

  • Canned responses: Save frequently used replies

  • Schedule send: Perfect for different time zones

  • Undo send: Correct mistakes before they’re permanent

  • Labels & filters: Keep your inbox organized

The Reply Loop Trick

This simple technique keeps your emails alive:

  • DO NOT ask one question per email

  • Always suggest a next step

  • Follow up in 48–72 hours if no reply

This turns emails into conversations rather than one-off messages lost in inboxes.


FAQ: Gmail Tips for Virtual Assistants

Q1: How do I make my emails more professional?
A: Use a clear subject line, proper greeting, concise body, bullet points for scannability, and a signature with your contact info.

Q2: What Gmail tools improve VA productivity?
A: Labels, filters, canned responses, schedule send, keyboard shortcuts, and undo send.

Q3: How do I handle multiple clients in Gmail?
A: Create separate labels and filters per client. Organize emails in folders and use a naming convention for attachments.

Q4: Should I use reply all?
A: Only when everyone on the thread needs the information. Otherwise, reply directly to the sender to avoid clutter.


Next Steps for Virtual Assistants

Mastering Gmail is foundational, but your growth doesn’t stop here. Advanced email management includes:

  • Automating follow-ups

  • Creating templates for client reports 

  • Integrating Gmail with project management tools 

Pro Challenge: Pick one email today—send, reply, or forward using everything in this guide. Notice how your communication becomes faster, clearer, and more professional. Repeat daily. In just a week, clients will notice.


Stop Wasting Every Email You Send. Your Signature Could Be Costing You Opportunities.

Here’s a truth no one tells new freelancers or small business owners: your email signature isn’t just decoration. It’s your digital business card, a silent salesperson, and sometimes the first impression clients or partners have of you.

Think about it—how many emails have you ignored because the sender looked “amateur”? Now imagine your email making the opposite impact: instantly professional, instantly credible, and easy to connect with.

Before we dive in, ask yourself: Does your current email signature actually make people want to contact you—or does it make them scroll past?

If you don’t know… keep reading. This guide will help you build one in less than 15 minutes.


Step 1: Keep It Simple, Not Cluttered

Your email signature should have all the essentials—but nothing extra. Too many links, colors, or quotes can distract.

Here’s the basic formula:

  1. Full Name – make it bold so it stands out

  2. Position/Title – e.g., Freelance Virtual Assistant, Social Media Specialist

  3. Business or Brand Name – if applicable

  4. Contact Info – email, phone (optional), website

  5. Social Links – LinkedIn, Instagram, or portfolio (limit to 2-3)

  6. Call to Action (Optional) – e.g., “Book a free consultation”

Interactive Exercise: Open your email now. Look at your current signature. Can you remove 1 unnecessary line without losing value? If yes, do it. Small tweaks = instant polish.


Step 2: Use the Right Tools

You don’t need Photoshop or expensive software. Here are easy, free tools to create clickable, branded signatures:

  • HubSpot Email Signature Generator – clean, professional, free

  • WiseStamp – adds social icons and customizable templates

  • Mail-Signatures.com – great for Gmail or Outlook integration

  • Canva – for more visual signatures (add logo or photo)

Loop Tip: Once you create your signature, send a test email to yourself. Does it load correctly on mobile and desktop? This little step is often skipped—but it’s the difference between “wow” and “oops.”


Step 3: Brand Consistency Matters

Your email signature should match your personal or business brand:

  • Use the same fonts and colors as your logo or website

  • Include your logo if you have one, but keep it small

  • Avoid huge banners—mobile users will hate scrolling past them

Interactive Exercise: Pull up your website. Copy your primary hex color into your email signature. Even tiny color alignment improves trust and recognition.


Step 4: Make It Actionable

An email signature can subtly encourage action:

  • “Schedule a free consult” → link to Calendly

  • “See my portfolio” → link to website or Behance

  • “Follow me for tips” → link social media

💡Only use one or two CTAs. Overloading with links turns it into spam.

Reminder: Every time you send an email, imagine it’s the first handshake with a client. Does it leave them curious to click, reply, or connect?


Step 5: Optimize for SEO and Visibility

Even though email signatures are “offline” in the sense of direct email, they can still help your brand appear in searches:

  • Use your real name consistently across Gmail, LinkedIn, website, and signature

  • Link to your website or portfolio with descriptive anchor text (“View my freelance portfolio” rather than just “click here”)

  • Add structured contact info (like a clickable phone link) for mobile SEO


Step 6: Test, Tweak, Repeat

  • Send emails to friends or your own accounts

  • Check formatting on Gmail, Outlook, Apple Mail, mobile

  • Remove anything that looks cramped or unprofessional

  • Update seasonally or when roles/services change

Final Loop: Go back to your inbox. Scroll through the last 5 emails you sent. Did your signature look professional on all of them? If not, now is your chance to fix it.


Quick Checklist Before Hitting “Send”

✅ Name bold and clear
✅ Title & role included
✅ Contact info correct & clickable
✅ Socials limited to 2–3
✅ CTA present but not pushy
✅ Branded colors & fonts consistent
✅ Logo small, if used
✅ Mobile-friendly

Your email signature is small but mighty. It works 24/7, silently promoting your brand, building credibility, and nudging clients toward action. Spend 15 minutes creating a professional one today—and watch how it changes the perception of every email you send.


Ever felt like your VA tasks are multiplying faster than you can handle?


Imagine having a tool that could help you write emails, draft reports, organize data, and even brainstorm ideas… all in seconds. Welcome to the world of ChatGPT, the AI assistant that’s about to become your new best friend.

Before you scroll away thinking, “AI sounds complicated,” let me show you how even beginner VAs can leverage it immediately—and how it can save hours of work each week.


Step 1: Understanding ChatGPT – Not Just Another Robot

Think of ChatGPT like a digital teammate.
It’s an AI-powered language model that can understand instructions in plain English and respond like a human. You can ask it to:

  • Draft emails or client messages

  • Summarize meetings or long documents

  • Generate content ideas for blogs or social media

  • Create templates, spreadsheets, or checklists

Interactive Prompt:
Pause for a second. What’s the task you dread the most as a VA?
Write it down. Now imagine if ChatGPT could do it for you in 30 seconds.


Step 2: ChatGPT for Daily VA Tasks

Here’s where it gets practical. A general VA’s work usually falls into these categories, and ChatGPT can help in each:

  1. Communication & Email Management

    • Draft professional client emails instantly

    • Create follow-up messages you don’t have to agonize over

  2. Scheduling & Calendar Management

    • Draft reminders and polite scheduling emails

    • Generate automated instructions for booking or event updates

  3. Research & Reporting

    • Summarize articles, websites, or market research quickly

    • Generate lists of leads or social media influencers

  4. Content & Social Media Support

    • Brainstorm captions, write scripts, or plan content calendars

    • Suggest hashtags and post timing for maximum engagement

Loop Moment:
If you’ve been manually doing any of these tasks, scrolling down isn’t enough—you’ll want to try this immediately. Keep reading, because I’ll give you exact prompts that save 1–2 hours per task.


Step 3: Interactive Exercise – Test ChatGPT Yourself

Open ChatGPT. Type this exactly:

 
Act as my Virtual Assistant. Draft a professional email to a client asking for updates on their project, keeping it polite but concise.

Notice how fast it gives you a ready-to-send draft. You can tweak tone, length, or details—all without starting from scratch.

💡 Make it interactive. Ask it to rewrite, summarize, or simplify as many times as you need. You’re training your AI teammate, not just using it.


Step 4: Secret Hacks Every VA Should Know

  1. Batch Tasks: Write all your emails or social posts in one go using ChatGPT.

  2. Template Creation: Generate templates for recurring tasks like client reports or invoices.

  3. Brainstorming Partner: Stuck on ideas? Ask ChatGPT to produce 20 options at once.

  4. Time Management: Ask it to make checklists or step-by-step instructions for any complex task.

Interactive Loop:
Think of one task that usually takes you an hour. Ask ChatGPT to do it in a fraction of that time. Then bookmark this blog—you’ll want to come back and expand your prompts.


Step 5: Common Mistakes to Avoid

  • Blindly Copy-Pasting: Always double-check AI outputs for accuracy and tone.

  • Overloading Prompts: Be specific. “Write email” is vague—add context, tone, and goal.

  • Skipping Learning: ChatGPT is a tool, not a replacement for your skill. Use it to amplify, not replace your expertise.


Step 6: Next-Level Use – Combining Tools

Once you’re comfortable, pair ChatGPT with:

  • Google Sheets: Auto-generate tables or reports

  • Canva: Draft captions and graphics ideas

  • Trello / Asana: Convert AI-generated lists into task boards

Mini-Challenge:
Pick a weekly VA task. Automate at least one part of it using ChatGPT + another tool. Notice how much time you save—it’s addictive.


Your AI Teammate Awaits

ChatGPT is more than a chatbot—it’s a productivity amplifier. For Virtual Assistants, it’s the difference between juggling tasks manually and running a smooth, professional workflow.

Stop here? Or take 10 minutes to try ChatGPT on your hardest VA task right now. Once you see results, you’ll keep coming back—and so will your clients.

The “Polish My Chaos” Trick

Got a messy Google Sheet or a jumble of client notes?
Ask ChatGPT to turn your raw, disorganized notes into clean, bullet-pointed reports, tables, or checklists.


💡 Works like magic for weekly updates or progress reports.

The “Time Travel Scheduler”

Input a client’s timezone chaos and a list of events.
Ask ChatGPT to make a schedule where nobody has to wake up at 3AM.

You’re basically bending time for your clients.


Para sa mga aspiring Virtual Assistants, Asana is your best friend. 💻✨
Kasi dito mo makikita lahat ng client tasks in one place—organized and stress-free.


Step-by-Step Guide: How to Use Asana

Step 1: Create an Account

  • Go to asana.com

  • Sign up using your Gmail or work email.

  • Choose free plan first (enough for most beginner VAs).

💡 Use your real name para professional ka agad sa eyes ng client.


Step 2: Set Up Your Workspace

  • Click “Create Workspace” → Name it based on client or project.

  • Example: Client Name – Social Media Tasks

  • Add team members if your client wants collaboration.

💡 Keep workspaces separated per client para hindi maghalo tasks mo.


Step 3: Create a Project

  • Click “New Project” → Choose List View or Board View

  • Name the project based on task type, e.g., Content Calendar or Admin Tasks

  • Add a short description para klaro sa client.

💡 Board view = parang Trello, List view = simple checklist. Choose what works for you.


Step 4: Add Tasks

  • Click “Add Task” → Write clear task names: e.g., Schedule Instagram posts

  • Assign yourself (or team member)

  • Set due dates & priority levels

💡 Always break big tasks into smaller steps para hindi overwhelming.


Step 5: Use Sections / Tags

  • Sections = para hatiin tasks by type or week

  • Tags = para makita quick category (e.g., Social Media, Admin, Research)

💡 Clients love organized VAs. Clear sections + due dates = professional AF.


Step 6: Track Progress & Communicate

  • Mark tasks Complete when done

  • Comment on tasks if clarification needed from client

  • Use Attachments to upload files/screenshots

💡 Asana keeps a timeline. Clients can see progress without you nagging. Win-win!


Step 7: Weekly Review

  • Check all completed tasks

  • Update upcoming tasks

  • Plan next week’s priorities

💡 10 mins review every Friday = super organized, clients notice.


Don’t stress about learning everything at once. Focus on:

  1. Adding tasks

  2. Setting deadlines

  3. Using sections/tags

Kapag master mo na ito, clients will see you as a reliable, organized VA.

📌 Para saan: Client meetings, job interviews, trainings, at kahit quick check-ins.
👉 Kung gusto mong magmukhang professional kahit work-from-home, dapat master mo ‘to.


Step-by-Step Guide to Using Zoom / Google Meet

1. Create Your Account (Free muna okay lang!)

  • Zoom: sign up via email or Google.

  • Google Meet: automatic na sa Gmail mo.

2. Download the App or Use Browser

  • Zoom: mas stable if naka-download sa desktop/mobile.

  • Google Meet: pwedeng diretso sa browser (no hassle).

3. Set Up Your Profile

  • Lagay ka ng clear, professional profile pic.

  • Display name = Full Name (hindi “cutie123” pls 😅).

4. Check Your Tech

  • Gumamit ng headset or earphones para iwas echo.

  • Stable WiFi = stable impression.

5. Join or Schedule a Meeting

  • Zoom: may “Schedule” button, automatic send ng invite link.

  • Google Meet: connect agad sa Google Calendar.

6. Test Audio + Video 5 mins Before Call
💡 Walang kliyente may patience sa late + tech issues.

  • Open camera, check lighting (harap sa window = instant glow up 💡).

  • Say a few words to test mic clarity.

7. Practice Good Meeting Etiquette

  • Be on mute kapag hindi nagsasalita.

  • Nod, smile, and look at the camera — para engaging kahit online.

8. Record (If Allowed)

  • For trainings, client calls, or walkthroughs.

  • Para hindi ka nalilito sa notes.

🔥 Why This Matters for VAs:
Kapag marunong ka sa Zoom/Meet, clients feel secure na hindi ka tech-challenged. Plus, mabilis kang ma-hire kasi confident ka sa online communication.

Week 2: Skills Application + Freelance Readiness

📌 Writing a Proper Email

  1. Clear Subject Line

    • Think of the subject line as a headline. It should say exactly what the email is about.

    • Example:

      • Instead of: “Update”

      • Use: “Meeting Notes – Aug 28 Client Call”

      • Instead of: “Help”

      • Use: “Request: Access to Canva Pro for Marketing Materials”

  2. Professional Greeting

    • Use “Hi [Name],” or “Hello [Name],” instead of casual “Hey” unless you’re sure the client prefers it.

  3. Straight to the Point

    • Clients are busy. Use short paragraphs and simple language.

    • Example format:

      • Opening: “Just checking in regarding…”

      • Body: What needs action / update.

      • Closing: Clear next step + timeline.

  4. Call to Action (CTA)

    • Always close with what you need from them.

    • Example: “Please confirm by Friday so I can proceed with the draft.”

  5. Professional Closing

      • Use: Best regards, All the best, Thanks, + your name.

      • Avoid: “Cheers” or emojis (unless your client’s culture is casual).


📌 Subject Line Tips for VAs

  • When sending tasks:

    • “Draft Social Media Calendar – September”

  • When requesting approval:

    • “For Approval: Website Copy Draft (Homepage)”

  • When following up:

    • “Follow-up: Pending Invoice for July”

  • When scheduling:

    • “Proposed Meeting Times – Week of Sept 2”


📌 Extra Email Etiquette for Aspiring VAs

  • One topic = one email. Don’t cram everything in one thread; it gets lost.

  • Don’t spam. If the client hasn’t replied, wait 24–48 hrs before a follow-up (unless urgent).

  • Use bullet points. Makes reading faster.

  • Check tone. Reread before sending—avoid sounding demanding or passive-aggressive.

  • Proofread always. Typos = sloppy impression.

  • Use professional email addresses. Yourname@gmail.com 

Kung sawa ka na sa tanong na “Anong oras ka free?” sa mga clients, kailangan mo na ng Calendly.
This tool will save you time, make you look more professional, and give clients a smooth booking experience.

At the best part? Libre siya! 🎉

In this blog, I’ll show you step by step how to use Calendly, perfect for beginners and aspiring Virtual Assistants in the Philippines.


Step 1: Sign Up on Calendly

Go to calendly.com and click Sign Up.
Pwede kang gumamit ng Gmail or work email mo.

✨ Mas maganda kung work email (e.g. yourname.va@gmail.com) para legit and professional sa clients.


Step 2: Connect Your Calendar

Sync Calendly with your Google Calendar or Outlook.
Para every time someone books a meeting, automatic blocked off na yung oras mo.

✨ No more double booking. Automatic ang update sa calendar mo.


Step 3: Set Your Availability

Choose your working hours. Example:

  • Monday to Friday, 9 AM to 5 PM

  • Weekends off (set boundaries early 😉)

✨ Always check your timezone settings para hindi ka malito kung US-based or international client yung magbo-book.


Step 4: Create Event Types

Decide kung anong klase ng call ang i-o-offer mo. Some examples:

  • 15-min Discovery Call (perfect for new clients)

  • 30-min Strategy Session

  • 1-hour Client Meeting


Name it clearly para hindi malito ang clients.


Step 5: Share Your Link

Once you’re done, Calendly will give you a unique link (example: calendly.com/yourname).
Send this to your clients via:

  • Email

  • Messenger

  • Even your email signature

✨ This looks way more pro kaysa sa “Pwede ka ba bukas ng 2 PM? Hindi? 3 PM na lang?” na endless back-and-forth.


Step 6: Set Up Reminders (Optional but Powerful!)

You can create automated email reminders for your clients before the call.
This reduces no-shows and makes you look extra reliable.


Step 7: Show Up Confidently

On the day of your call, just open your synced Google Calendar.
Nandun na lahat: client’s name, meeting time, and even Zoom/Meet link kung naka-connect.

✨ Log in 5 minutes early para you look professional and ready.


Why Virtual Assistants Should Learn Calendly

  • It saves time (no more manual scheduling).

  • Clients appreciate the professionalism.

  • It’s FREE and easy to use.

  • Bonus: Makes you stand out vs. other VAs who still do scheduling manually.


📌 Don’t overcomplicate it.
Master the basics of Calendly and you’ll instantly look more organized and client-ready.

THIS FREE TRAINING is still a 🚧 WIP 🚧